Candlemas Day - Making Beeswax Candles
by Catherine Fournier
About Candlemas
The second of February is the feast of the Presentation of the Child Jesus in the Temple. This is the event we meditate on in the fourth Joyful Mystery, when both Anna and Simeon recognised the Christ Child as the Messiah.
This feast day is also called the Feast of the Purification of the Blessed Virgin. In Jewish law, forty days after the birth of a child, a mother was required to offer a sacrifice of purification before she could resume her normal activities and movement in society. The sacrifice was to be a lamb or young pigeon, or if she was poor, a pair of young pigeons or turtledoves.
In this feast the candles for the year's use are blessed and carried in procession. Beeswax candles are specified, the beeswax signifies the humanity which God the Son assumed, and also shows that Jesus Christ is the True Light of the world. Candles represent the ardent faith, hope and charity with which we followers of Christ by humble obedience to his Gospel.
In these times of computers, Internet, holograms, and other technological marvels, what else is as humble as a simple candle? Yet what a powerful image a candle presents. The steady burning flame, the tall straight shape, the warm soft feel of the wax - a candle fascinates and draws us to its light.
Blessed candles are lit at Mass and other Church services. They are used in all sacraments except Confession, and in other liturgical ceremonies. We should have at least two blessed candles in our home for use when the sacraments are administered to the sick and for use at times of any special danger, blessing or family devotion.
Beeswax candles are simple and inexpensive to make, by all but the very youngest of children. In addition to use in our Advent wreath, at our family altar, and for special feasts, homemade beeswax candles also make wonderful gifts to friends and family. The varieties and possibilities are almost endless.
Making Beeswax Candles
Materials:
- sheets of beeswax (approximately 16 x 8 inches)
- wick
- hair dryer.
- cookie cutters
Beeswax is easier to handle when warm, so work in a warm room, if you can. The most important thing to remember is that a loosely rolled candle will burn quickly because more air is available , so form your candles as tightly as possible.
Method One: Rolled Candles:
|
If the beeswax is rolled, gently unroll it. If it is stiff, or cracks while unrolling, soften it by gently warming it with the hair dryer set on low. |
|
If you simply lay a piece of wick along on short edge and roll it up, you will have a nice straight thick candle. For tapered candles, refer to the illustrations below: |
 |
|
After cutting, lay a length of wick along a short edge and firmly fold the wax over it. Squeeze it together firmly. The wax is slightly sticky, so this is easier than it sounds. Begin rolling the candle, making sure that it is tightly rolled and as even as you can make it. |
 |
|
When you have finished rolling all the wax, run the hair dryer over it to mold the edges together just a bit, and soften the bottom so that you can give it a nice flat smooth surface. |
|
Because you cut the sheet in half, you will end up with a pair of matched candles. If you wish, you can lay two sheets of different colours, one on top of the other, before you start rolling. This will give you a layered striped candle. |
Method Two: Flat Candles:
(This method is especially good for the littlest ones, who may find rolling evenly difficult.)
|
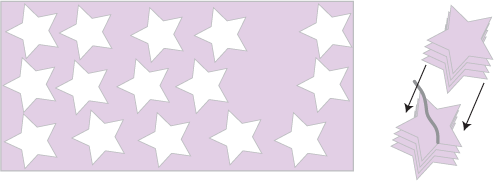
Again, begin by unrolling the sheet of beeswax. Select a cookie cutter and cut out an even number of shapes from your sheet of wax. 12 to 16 pieces is about right. |
|
Divide your pile of shapes in half. One at a time, put one piece on top of another and squish them together, making sure that they are firmly stuck together. |
 |
|
When you have 'sandwiched' half of your shapes, lay a piece of wick on it and continue to squish the rest of the wax pieces onto your sandwich, trapping the wick between the two thick layers of wax pieces. Occasionally heat it with the hair dryer, this will help the wax stick together. |
|
When you've done, trim the wick and set your candle upright. Again, there are infinite variations of shapes and colours possible with this method of candle making. |
No need to waste the left over little bits. Collect the scraps and melt them in a can over simmering water and pour them into a mold with a wick. A small preserving jar, an empty toilet paper roll, almost anything will work as a candle mold. Just don't forget the wick!
Return to Fridge Art Page.