Table-Top Angel
by Catherine Fournier
This angel takes a little more time and skill to create, but it is still quite easy and also quite beautiful. There is lots of opportunity to make this angel special. The fabric for the body and skirt, the material to make the wings, and the way you paint the face, will all give your angel an individual and unique appearance.
Start by assembling the materials you need:
Head:
- a styrofoam ball, about 1 1/2 inch in diameter (you can use a ball of polyester filling, or a large bead, or a piece of modelling clay or playdough, just about anything as long as it is round and the right size)
- circle about 6 inches in diameter of white or skin coloured fabric
Hair:
- yarn, spanish moss, a gold pot-scrubber,sheep's wool
Body:
- light cardboard, like a cereal box
- at least 42 inches of 6 to 8 inch wide lace or cotton embroidered edging (the edge of an old embroidered tablecloth looks really nice) One layer will do if the fabric is closely woven, if it is really lacey you will want two or three times as much fabric cut to 36 inch lengths.
Arms:
- white pipe cleaner
- strip of fabric used for head, about 2 inches wide and 10 inches long
Wings:
- 18 inches of 3 inch wide wire edged ribbon, or more of the lace fabric used for the body, or a paper doily
Decoration:
- narrow ribbon
- small beads
- paint or marker for face
- small folded paper for a book, a small gold horn, anything else an angel might hold
Other stuff:
- glue
- stapler
- needle and thread
- embroidery thread and embroidery needle
- pins, scissors
- ruler
- clothespins.
Then cut out and assemble the pieces of the angel, following the illustrations below:
The Head:
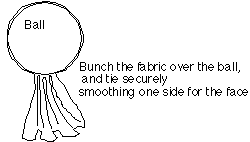
Cut out the circle of fabric for the head and drape it over the ball. Gather it together at the bottom and tie a piece of thread around the gathered fabric. Smooth the fabric on one side of the ball for the face.
The Body:
Cut out the pattern piece for the body on the light cardboard. Bring the circle together to make a cone, and glue, staple or tape it securely. Make sure the hole at the top is big enough for the 'neck' of the angel's head.
Insert the angel's neck into the hole and tape, staple or sew it in place (poke the needle through the cardboard and then through the neck fabric) Do it firmly enough that the head stays upright.
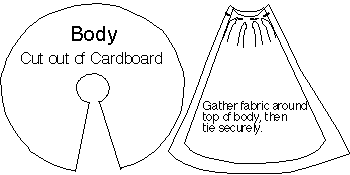
Then, take a 36 inch skirt fabric piece and hem along the plain (un-embroidered) edge and down both sides. Run long basting stitches along this top edge and pull them to gather the fabric.
Put the gathered edge around the neck of the angel, and gather it some more until it fits well. Tie these gathering threads together.
With a needle and thread sew a stitch at the back of the neck into the skirt fabric, wrap the thread around the angel's neck a few times and take another stitch. Stitch into the neck fabric too, just make sure that the skirt is firmly gathered and attached and that the head is straight.
If you are using more than one layer of skirt, repeat the steps.
The Sleeves:
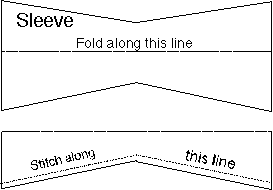
Cut the sleeve piece out of the remaining skirt fabric. Fold it, right sides together and sew it.
The Arms:
If you want the arms together at the front of the doll, follow the directions on the illustrations. Thread the clasped hands and arms through the sleeve piece and sew the ends of the arms together. Then pull the arms around until the sewn seam is inside the middle of the sleeve. Put the sleeve arm assembly over the angel's head and fasten it at the back of the neck with a few stitches.

If you want separated hands, sew the arm piece together and cut it in half. Sew across one cut end of each arm piece. Turn the arm pieces right side out, and push a folded pipe cleaner inside each one. Staple or sew the pipe cleaner to the open end of the arm piece. Now, thread the arms into the sleeves, making the two open ends meet in the middle of the sleeve piece. Fasten them in place with a few stitches. Sew the sleeve arm assembly onto the back of the angel's neck and bend the arms to the angle you like.
The Wings:
If you are using a piece of skirt fabric for the wings, cut it lengthwise so that it is only 3 or 4 inches wide. Gather a 8 inch length tightly with long stitches and wrapping stitches, then fasten it to the angel's back, on top of the sleeves. Repeat for the other wing.
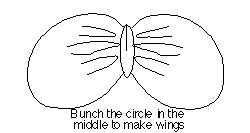
If you are using a circular doily or piece of lace, follow the directions in the illustration below.
If you are using wire edged or plain ribbon, tie a big bow in the ribbon and fasten it to the sleeve at the back of the angel.
Finishing the Angel:
Put hair on the angel. Depending on what you are using, sew or glue the hair in place.
Put a face on the angel. Simple black circles for eyes and an oval for a singing mouth is enough. For a closed mouth use a slightly curved red or black line. It is important to remember that eyes are half way down a head, the hair takes up a lot of head. Try lightly marking the eyes and mouth with pencil or pins stuck into the head, until you are satisfied with the look of the angel.
To decorate the angel, try a long piece of bright narrow ribbon tied around the neck and hanging down the front of the angel's skirt. Add a halo of seed beads or narrow ribbon around the head and something in the angel's hands. If the back of the angel looks a bit messy because of all the pieces and sewing, glue a piece of ribbon or fabric over it all, down the middle of the wings to hide it.
Now, put the angel on the table in front of you, arrange the skirt smoothly, make the wings straight, get the arms at exactly the right angle. Doesn't it look nice?
Return to Fridge Art Page.